Why doesn't the back look as good as the front?
One of my biggest problems when I was learning how to handsew is that, while the front looked more or less ok, the back was a mess. It took me a while to figure out how to fix this.
One reason this happens, is that your needle is going in at a diagonal and not straight up. If you are doing your running stitch one stitch at a time (needle down, pull, needle up, pull) it helps if you check the back every time you make a stitch at first, to train your hand to put them in the right place. Another way to fix this is (if your fabric is thin enough to allow it) is to make one whole stitch in one go (down up, pull). With this, you really need to watch not only the length of the stitch, but the length of the negative space between the stitches, as this is your stitch on the back.
Now, if it's just a matter of some stitches being longer than others, you can always cover it up with a flat-fell seam. Uneven stitches running diagonally to the seam can affect the way the garment sits and falls, though. I know it's frustrating, but don't hesitate to take out part of a seam and re-do it! You'll be happier in the long run.
Friday, June 26, 2009
Tuesday, June 23, 2009
Still no second piece
I have not been working on the second piece and that may be a good thing. A friend, with whom I discussed at length that the secrets of sewing lies often in the order of assemblance, has told me to try and sew the joining of the leg part to the upper foot part first. I will try that, alas, I have also found some other pictures.
These are fancy and purportedly women's hosen
But frankly I doubt it, because the site linking to it was englishspeaking and the notes underneath the sock says that this is an exhibit of a Dommuseum, a clerical museum, and it would seem awfully frivolous for that. also the note gives no indication of this being a lady's garnment. What is an interesting detail ,though, is the upper right corner of the stocking in the picture.
Now this picture is rather straightforward and it does show black hosen on the lady:
and another picture of a woman getting raped ... but she is wearing socks
Elisande
Monday, June 22, 2009
For the German Participants
Just a heads up that Karstadt is selling wonderful raw silk, 90 cm wide, in all colors, for 8 euro a meter (if you need some for your project)
Sunday, June 21, 2009

Gottfrieds codpiece starts
Hi all
Well I have been very lax lately in getting my project started, but it is on its way now
So that I don't take up to much room I will only be posting one picture here but the rest can bee seen till the end of the challenge at:
http://www.flickr.com/photos/77086627@N00/sets/72157619995383885/
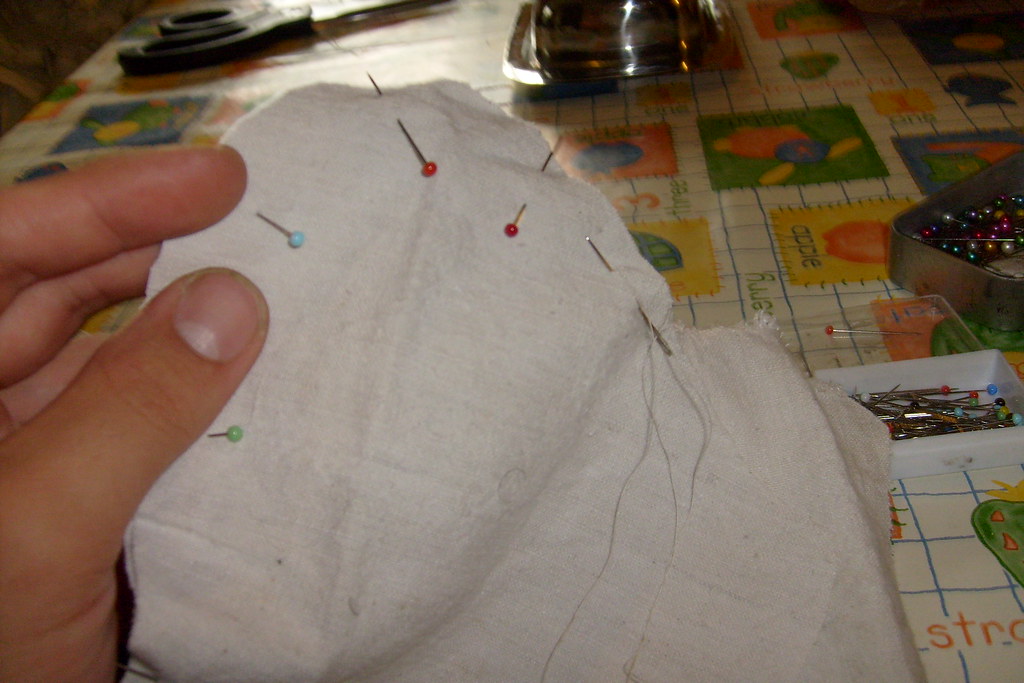
So what I have done is made the pattern for the codpiece this will be cut out of linen and the wool.
The silk will stay like it is an attached to the linen once the linen and wool parts are sewn together.
Right now I am sewing the Linen parts together. Once that is done it will be stuffed as hard as I can with scraps I have left from other sewing projects. Then sew the last bit shut. After that I plan to throw it in the washer to mat it down as much as possible and stuff it some more.
Once the Wool part is sewn and the silk has been attached to the Linen part, the linen part (with the silk attached) will be put in the wool codpiece.
Here a picture of me working on the linen part
Gottfried
Well I have been very lax lately in getting my project started, but it is on its way now
So that I don't take up to much room I will only be posting one picture here but the rest can bee seen till the end of the challenge at:
http://www.flickr.com/photos/77086627@N00/sets/72157619995383885/
So what I have done is made the pattern for the codpiece this will be cut out of linen and the wool.
The silk will stay like it is an attached to the linen once the linen and wool parts are sewn together.
Right now I am sewing the Linen parts together. Once that is done it will be stuffed as hard as I can with scraps I have left from other sewing projects. Then sew the last bit shut. After that I plan to throw it in the washer to mat it down as much as possible and stuff it some more.
Once the Wool part is sewn and the silk has been attached to the Linen part, the linen part (with the silk attached) will be put in the wool codpiece.
Here a picture of me working on the linen part
Gottfried
Friday, June 19, 2009
A Huzzah to you all
Well I Just wanted to say a BIG thank you to all of our challengers.
I must say that I have been impressed on many levels with everyone's attention to detail and the grate help that you are giving each other.
I think it is really grate that you have been trying to get your projects as accurate as you can, and it is really inspiring to see all these wonderful projects, especially for my lazy but.
I would really like to say thank you to all of are sewing help instructors for all of the help you have provided, especially to Maestra Anya for her wonderful Hand sewing tips of the Week.
Also I would like to say a big sorry for being lax with getting my project up and going I will get on that this weekend.
thanks again for all the support for this Challenge
Gottfried
Thursday, June 18, 2009
Handsewing tip of the week (#3)
Dealing with knots:
Ok, so you're sewing, things are going well, and then you get a knot in your thread. Here are some tips for dealing with the pesky little buggers:
1. Avoid them all together: As you sew, your thread will begin to twist. This makes the thread knot. To fix this problem, every so often, let go of your needle and let it hang by the thread. This will allow it to un-twist itself, which will, in turn minimize your knots.
2. The simple knot: the most common knot you'll get is also the easiest to deal with. First of all, *be gentle!!!!* pulling tightly at a knot is the easiest way to make it stronger!!! Simply put your needle through the loop and gently tug at one thread. If that doesn't straighten it out, keep the needle in place and gently tug at the other thread. Nine times out of ten, it will unravel itself. Never tug at it or you will end up with an impossible knot!
3. Freaky knots: Every so often you'll end up with a bizarre knot of sorts with several knots all wrapped around themselves. Use the principle of point two. Choose a loop, and follow procedure 2. If that doesn't work, ease your needle into another loop and try again.
4. Twisty end knots: Sometimes the loose end of the thread will knot itself around the main thread. This is not cool. The best way to handle such knots is to run the knot up to the eye of the needle, cut the thread just below it, and rethread.
It's hard to describe these techniques, so if anyone is interested, I'll take photos of knots as I get them and photos of me getting them out...so, uh, is anyone interested?
Wednesday, June 17, 2009
Greetings from fair Northshield.
Merouda Pendray sends greetings unto those who shall receive these letters patent.
First, I took a quick picture of my favorite showing of the stockings for Elisande:
The picture: Jezebel being devoured by dogs from the History Bible of Evert van Soudenbalch, Utrecht, c. 1460.

The colors are close, but if you pay attention, you'll note the stockings are a carnation color and the flesh tone is... well.. flesh tone.
As for what I should like to sew....
I have always had the desire to do a skin out outfit by hand, but I doubt that I shall be able to do so in space of a year, unless I choose to give up all other projects. That is not going to happen.
I do hope to get a linen dress done, but I will be starting with a woman's cap, based on the research presented here. One of my most loved (and least flattering, alas!) outfits is a 13th c. dress/underdress set given to me by my apprentice, and, while I am a big proponant of proper headgear, I have never liked the 13th c. veil with the set. I prefer the dress of the late 15th and early to mid 16th c., and this cap will do well to serve the clothing of my era and yet complement the clothing gifted to me. :-)
First, I took a quick picture of my favorite showing of the stockings for Elisande:
The picture: Jezebel being devoured by dogs from the History Bible of Evert van Soudenbalch, Utrecht, c. 1460.
The colors are close, but if you pay attention, you'll note the stockings are a carnation color and the flesh tone is... well.. flesh tone.
As for what I should like to sew....
I have always had the desire to do a skin out outfit by hand, but I doubt that I shall be able to do so in space of a year, unless I choose to give up all other projects. That is not going to happen.
I do hope to get a linen dress done, but I will be starting with a woman's cap, based on the research presented here. One of my most loved (and least flattering, alas!) outfits is a 13th c. dress/underdress set given to me by my apprentice, and, while I am a big proponant of proper headgear, I have never liked the 13th c. veil with the set. I prefer the dress of the late 15th and early to mid 16th c., and this cap will do well to serve the clothing of my era and yet complement the clothing gifted to me. :-)

Anya was so kind to help me with a couple of additional links to suport the idea that women were indeed wearing Hosen.
This is a biblical scene and the lady in the middle is wearing green hosen. They seem to have some form of pattern.
There is another picture out of the Trés Riches Heurs du Duc de Berry. February you can see it here: http://historymedren.about.com/od/booksofhours/ig/Tr-s-Riches-Heures/February---Tr-s-Riches-Heures.htm
It is quite possible that also the lady in the front is revealing her hosen, but the coloring is so close to skin tone that I did not consider it a definite. Anya drew my attention to the lady in the back of teh shed. There you can clearly see the hem of the hosen, the color of which is indeed the same as the legs of the lady in the front.
Appenrently there is also written evidence as Henry the VIII aparently ordered silken hosen for his sister. But that is a second hand statement. I have not been able to verify this, so far.
Friday, June 12, 2009
Handsewing tip of the Week (#2)
Making eylets easier!
Eyelets and buttonholes can be a bit scary, but a few steps can make them look better and last longer!
1. Space them from 3/4ths of an inch to an inch apart. This is near enough that there aren't any crazy gaps, but far enough away that you don't end up spending the rest of your life working on one dress :-D
2. Secure the fabric: This makes your eyelet/buttonhole area stronger and prevents pulling. On either side of where you're putting your eyelets, run a row of running stitch:
l 0 l
l 0 l
l 0 l
l 0 l
3. Secure the eyelet: before sewing the eyelet, stitch around where the eyelet will be with a running stitch. This helps prevent slippage.
4. Use silk cording or buttonhole cord for stronger eyelets, or use the threads unravelled from the same fabric as the garment to make "invisible" stitching on your eyelets.
the first part


this is the first sock
I started by making a mock up in a different fabric. then i cut out the pattern I made. I started by putting the pattern together with a broad running stitch.

then, using tiny backstitch, I sewed it all together.
I finished the seams carefully, using the *fold it over and pin it down* method
Thursday, June 11, 2009
Petronilla's Handsewing Project
Greetings from my Kingdom of Artemisia,
I am Baroness Petronilla from the Shire of Twae Linnes. I'm apprenticed to Mistress Duchess Albreda.
I've been taking some classes on hand sewing over the past year and have planed some projects to attempt.
When I saw your First Time Handsewing Challenge I've become more inclined to start a project now. As I'm preparing for Uprising next week I will confer with those who do handsewing at the event and then select a project.
Thank you Gottfried for arranging this challenge.
Petronilla
Accepting Gottfried's challenge
Greetings all, from the Barony of the Cleftlands in the fairest Kingdom of the Midrealm. I have sewn many things with machines, and an occassional seam or repair by hand, but never completed a whole item by hand. I am still undecided as to my selection, though it will be something from the 14th century English area. If I don't panic I may try a silk jupon lined in linen similar to that found in the effigy of Prince Edward. If I find that too overwhelming I may try a hood, arming cap, or kidney pouch in the same style.
Cheers,
James ap Llewellyn, squire to Sir Gauss Magnusson, loyal subject of the Midrealm
Sunday, June 7, 2009
greetings

Greetings, my name is Alicia Ravenspure from the kingdom of Ealdormere. I thank you for this opportunity for me to try my hand at creating a garment completely by hand. I am an experiences sewer by trade but I have always relied heavily upon the conveyance of the sewing machines. I have made many dresses for my eldest daughter in the past and I have decided to make a dress for my youngest this time. She is two currently but should be almost 4 by the time this is all said and done. The girl in the painting i found looks to be in her early teens so I’m going to scale the dress down for my daughter but keep the rest the same. I hope that that is ok?
Saturday, June 6, 2009
Elisande's Project

My name is Elisande Walters form the shire of Drei Eichen in the fair Kingdom of Drachenwald. Anya was kind enough to let me use her computer today, so I am posting from that IP adress. I have been sewing for a long time but only recently started to do more than just a few stitches by hand. I am as new to handsewing as I am experienced in using all kinds of machine (I even used a hand driven one for a while at my grandma's).I have never ever sewn a complete piece by hand.
I will participate in this challenge by sewing myself a pair of socks. Well, not really socks, but actual short hosen as we think women wore bac then. The picture shows a pair of silk red hosen, which I will try to duplicate as well as my skill allows me.
The picture is a photograph depicting an exhibit at the Palacio real de Madrid. The picture is taken out of the catalog:
"Hose of Rodrigo Ximenez de Rada, 1247 AD, red silk. Source: Vestiduras Ricas: El Monasterio de las Huelgas Y Su Epoca 1170-1340. Exhibition at the Palacio Real de Madrid, June 2005. Patrimonio Nacional."
The hosen were apparently in the possession of on *Rodrigo Ximenez*. A man. I am not sugesting he was a cross dresser but there is no evidence suggesting that women's hosen were cut any differently and I will keep looking for *women's* underwear. I liked that these were not just a *depiction but a photograph of the real thing.
Friday, June 5, 2009
Handsewing tip of the Week
Beeswax is your friend!
When you handsew, especially if you're using linen thread (which tends to break easily), you need to make your thread as strong as possible. The trick is beeswax. Get a big chunk of it and keep it in your sewing kit (you can usually find it at art supply shops). Before you thread your needle, run your thread through the beeswax a few times. I use my thumb to press it down into the wax as I run it through, but find the way that works best for you! Regular candlewax will unfortunately not work...it's gotta be the real deal!
Enjoy!
Tuesday, June 2, 2009
Taking part in this Challenge
I want to make a real handsewn Birka-Viking apron.I will use green,hopefully gark green,wool .I will take the original Birka-founded cut for it. Maybe I can dye the wool for myself...And there will be mediveal stitches all arround to border it,with dark red wool.
I will research to find a picture to show what I'm going to do.
I will research to find a picture to show what I'm going to do.
Monday, June 1, 2009
Gottfrieds challenge
Greetings all
Well this is not the first time that I will be hand sewing but since it is my challenge I thought I should join with a project.
So my challenge project will be a codpiece dating from about 1566. My documentation is a colorized Woodcut of a Trabant of Graf Niklas Zrinyi retinue (Landesmuseum Joanneum, Alte Galerie, Inv. Nr. AG 10784-10786). The Picture is taken out of “Imperial Austria: Steirische Kunst- und Waffenschätze aus vier Jahrhunderten” ISBN 3-902095-00-8
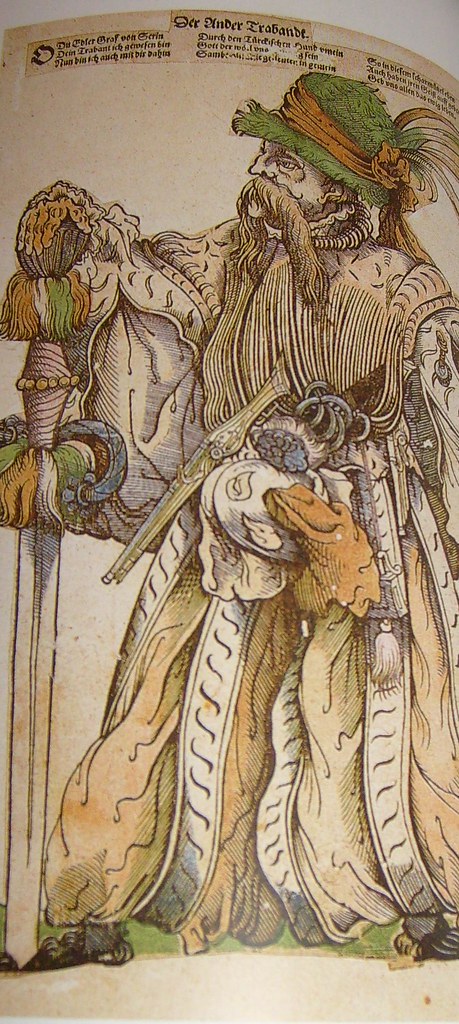
I plan to use Wool as the outer layer that will be slashed. The stuffing that will be coming out of the slashing will be made of Silk.
The left side of the outer codpiece will be Hunter green, the right side will be lime green and the silk will be exactly reversed.
Well this is not the first time that I will be hand sewing but since it is my challenge I thought I should join with a project.
So my challenge project will be a codpiece dating from about 1566. My documentation is a colorized Woodcut of a Trabant of Graf Niklas Zrinyi retinue (Landesmuseum Joanneum, Alte Galerie, Inv. Nr. AG 10784-10786). The Picture is taken out of “Imperial Austria: Steirische Kunst- und Waffenschätze aus vier Jahrhunderten” ISBN 3-902095-00-8
I plan to use Wool as the outer layer that will be slashed. The stuffing that will be coming out of the slashing will be made of Silk.
The left side of the outer codpiece will be Hunter green, the right side will be lime green and the silk will be exactly reversed.
Subscribe to:
Posts (Atom)